Linux photo management - Darktable
Linux photography series
- Rant about my first impressions and problems letting old habits go.
- Round 1 is about my first raw edits using Darktable.
- Round 2 discusses managing the developed pictures with Digikam.
- Round 3 focuses on exporting images from Digikam and publishing them in a gallery.
Why leaving Lightroom?
Adobe announced a renamed Lightroom 7 as Lightroom Classic CC and introduced the new Lightroom CC. If you do not have an cc account and you like to escape the vendor lock in of adobe, you have to stop using it. I would even pay the adobe for providing a linux version. So I took a look at the alternatives again. I know it will be hard, because I use lightroom since version 3 and this is quite a while. So, take a deep breath and follow me…
Workflow?
There is a completely different mindset in the Linux world than in the windows world. In Windows you try to have one tool to rule them all and in Linux you have one tool for one task. So I have to rethink about my workflow and how to structure it. My workflow is not complete yet. I just started testing the first parts of it. In this part I will show my new filesystem structure and the steps I identified so far.
- Copy images using Rapid Photo Downloader (0.97+) to my NAS
- Defining a jobcode for the images (e.g. studio-shooting)
- Rootfolder is
<yourNasPictureRoot>/raw - Creating folder hierarchy like
<Image date (YYYY)>/<Image date (YYYY)>-<Image date (MM)>-<Job code> - Rename files with the following format
<Image date (YYYY-MM-DD)>-<Job code>-<Session number (Three digits)>-<Image number (All digits)>. This format keeps the original image number and adds a incrementing image number starting with the current session.
- Import the newly created folder to darktable.
- Basic work with the lighttable module
- Going through the images and mark the non keepers in the lighttable as rejected
- Filter only rejected images, select all and delete them from the disk (move to trash)
- Apply event tags
- Apply basic styles like noise reduction
- Detailed work with the darkroom module
- base curve
- set white balance
- sharpen
- crop / rotate
- additional modules and settings
- Export images to the NAS with the rootfolder
<yourNasPictureRoot>/jpg/<originalImageFolderHierarchy> - …. to be defined!
The question is why? Why do I have two root folders, One for jpg and one for raw? This is quite simple to explain. I use the raw folder as some sort of archive now. There is the raw file with the corresponding sidecar xmp file that contains the darktable settings. All steps following the raw development will be done with other tools. So these tools will not show me the raw and the jpg files but only the developed jpeg. Also, I do not accidentally kill a raw file when I manage my libraries. If I delete a jpg by accident, I can restore it quite easy with darktable.
Tools
Rapid Photo Downloader
As I use arch, it was quite easy to get the latest version of this tool. And in the latest version it has real cool features. Import with copy and rename including creation of the folders is nice. It also supports video for vloggers. I configured my folder and file naming scheme. With this setup, I do not have to worry where to put my images. They are stored by the same rules as my other images.
Darktable
![]()
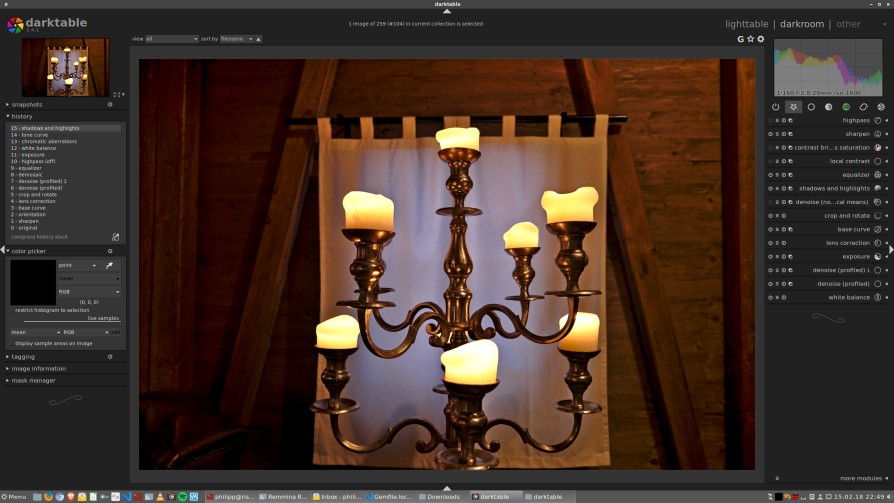
If you are not willing to take the step and accept the steep learning curve, you will not be happy with it. But it is worth the effort. Darktable is a really powerful raw development tool. It has a ton of modules to do all the improvements an image may need. This has a downside as well. Normally there is more than one or even two ways to reach a given goal. Let me explain this with the example of image denoise.
In Lightroom I only have one denoise section with luminance and color settings. In darktable you will find at least three denoise modules.
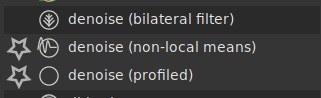
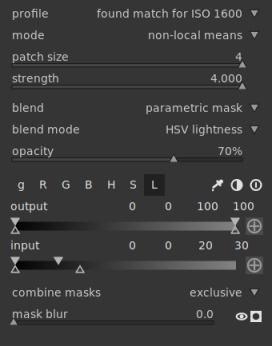
None of the three modules will do it’s job out of the box as good as the one in lightroom. So I went out to our big search engine and tried to get help. I found a discussion at flicker that gave me the following starting point for denoise (german screenshot).
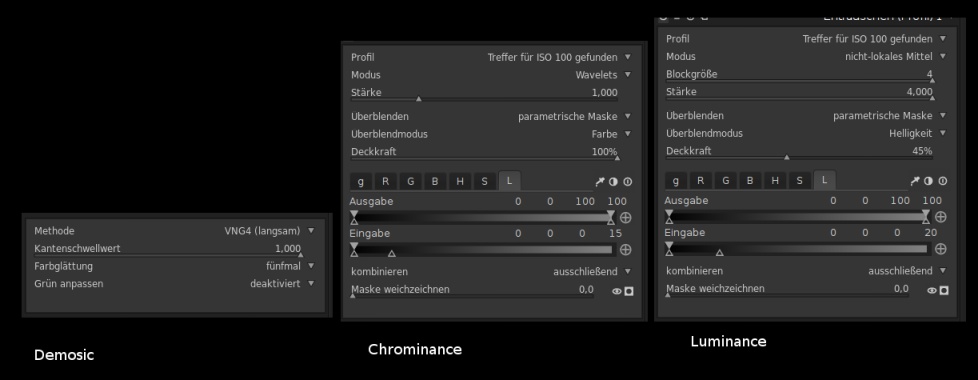
As there are profiles for my camera available, I use the profiled denoise. But nut just the module as it is, I use one for luminance and one for color. So for the example image show in the main view, I have the following two settings active. Both are instances of the “denoise (profiled)” modules. Using this method to remove the noise from the image, it is as easy to remove the noise from the image with the same quality as Lightroom provides. Yes, I takes some time at first. Now, I just save these settings as a image style and have a one click starting point. Doing this for the most common variations makes it really easy to apply later. And if I have to adjust the settings, it does not take more time than I needed before darktable.
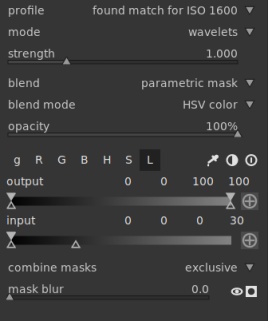
Update: Beware that the order of the modules in Darktable is important as it represents the order of processing. You get better results if you remove the color noise first and then the lightness noise.
What’s next?
I am quite happy with my first steps towards a fully open source based solution for my photography. The features one can get with tools like darktable are just amazing. I still have to learn a lot. So there are the next steps like automatic upload to my internal piwigo gallery, local management of the jpegs and keeping track of places where updates should go. How to manage virtual albums or smart albums built upon tags and metadata. These questions are not answered today but I will have a look at it and add follow up articles.
Just one sidenote on comparing darktable with lightroom. Most articles I read are using darktable like lightroom and expecting all modules behave the same in both. This explains why many think lightroom is much “better” than the rest. You have to use the tools as they are designed to get the more realistic comparison. Both tool have their advantages and disadvantages. So be careful when reading these comparison articles out there. Many know lightroom but not how things work in darktable.