Howto setup Nextcloud
I currently have Seafile as my primary server to share my files. I also have a additional installation of a caldav and carddav server called baikal. This is fine so far and works but has a lot of different components to maintain. As Nextcloud made some progress I think it is time to take another look at it to find out if I should replace Seafile and the other servers with one Nextcloud installation.
In this post I just show how I setup my own Nextcloud server using HA-Proxy, let’s encrypt and a virtual machine to run it.
Setup overview
As you already might see, this setup gets a bit more complicated than a standard one server setup. Eventually, you may set up all the services on one machine and it should work as well. Using this kind of installation, I do not have to configure all the backup and I use the benefits of the ZFS filesystem of free nas. Another reason is that I do not only serve Nextcloud on my systems but other https based services as well. HA-Proxy does the reverse proxy work and ssl offloading with let’s encrypt and multiple subdomains.
192.168.1.60"] nextCloud1 -->|send mails| mail[mail
mail gateway
192.168.1.20] nextCloud1 -->|ssl| mysql[mysql
192.168.1.100] nextCloud1 -->|nfs / smb| freenas[freenas
192.168.1.101] end subgraph Firewall pfSense[pfSense
192.168.0.1
Public IP] -->|port forward| haproxy[haproxy
SSL offloading
192.168.1.50] end subgraph LAN Client[Client
192.168.0.30] -->|https| pfSense end subgraph "BBI (Big Bad Internet)" ClientPublic[INet Clients] -->|https| pfSense end
If you prefer an easy setup, there might be different tutorials out there, that help you to set up everything on one machine. Also take a closer look to the official installation manual . In fact this blog post is based on their installation manual.
Preparing the virtual machine
OS installation
Important: if not mentioned otherwise, all commands are executed as root. You may use sudo as well to run these commands.
I do not cover how to set up a database server or a normal virtual machine.
There are many good tutorials out there how to setup a basic Debian server. I just mention some steps that I do on my VM after the initial installation.
During the setup I only install the basic tools and the ssh server.
One impartant thing is to make sure the IP does not change and is fixed. This can be done by editing /etc/network/interfaces and change the network configuration according to the following information.
allow-hotplug ens18
iface ens18 inet static
        address 192.168.1.60
        netmask 255.255.255.0
        broadcast 192.168.1.255
        network 192.168.1.0
        gateway 192.168.1.1
        dns-search example.com

iface ens18 inet6 static
        address xxx:yyy:zzz::60
        netmask 64
After rebooting, the system should be reachable using this IP address. I also make sure I can login using ssh and my local sshkey. For my virtual machines, I set up ntp, zabbix-agent and qemu-guest-agent.
Data share mount
The virtual machine should only contain the application and run the service. The data itself should remain on my freenas instance. In this installation, we’ll use nfs to mount this share to /srv/nextcloud.
Important: Choose a path outside of /var/www/nextcloud for your data to make sure they are not directly accessible through your webserver.
apt install nfs-client
mkdir -p /srv/nextcloud
nano /etc/fstab
mount -a
mkdir -p /srv/nextcloud/data
chown -R www-data.www-data /srv/nextcloud
The data folder inside the Nextcloud mount is there to separate potential additional folders that might follow in the future.
I do not like to have all stuff in the root of the mount.
The line to mount the share in my /etc/fstab looks somewhat like the example below. The nfs-server on my freenas has an ip restriction for the mount as well.
Yea, not the safest way, but ok for my setup.
192.168.1.101:/mnt/tank/nextcloud /srv/nextcloud nfs rw,noatime,rsize=32768,wsize=32768,timeo=14,intr,tcp,soft 0 0
Reboot the vm to make sure the mount comes back online when booting.
HA-Proxy configuration
The configuration below are the most essential parts I set up to run Nextcloud.
- All traffic comming on port 80 is redirected to 443
- the certificate is specified on the ssl frontend
- If the hostname matches, the traffic gets redirected to the backend
- I add the X-Forwarded headers to the request as I do on all my setups. This should make named virtual hosts work on the target side
- Finally I pass the traffic to the given Nextcloud host on port 80 without ssl
- HA-Proxy checks port 80 every 2 seconds and will fail the route when 3 checks fail and reactivate after 2 successful checks
frontend 80
    bind *:80
    mode http

    redirect scheme https code 301 if !{ ssl_fc }

rontend 443
    bind *:443 ssl crt /etc/haproxy/certs/current/www.example.com.pem ssl crt /etc/haproxy/certs/current
    mode http

    acl 443_cloud_host hdr(host) -i cloud.example.com
    acl 443_cloud_host hdr(host) -i cloud.example.com:443
    use_backend 443_cloud if 443_cloud_host

backend 443_cloud
    acl forwarded_proto hdr_cnt(X-Forwarded-Proto) eq 0
    acl forwarded_port hdr_cnt(X-Forwarded-Port) eq 0
        http-request add-header X-Forwarded-Port %[dst_port] if forwarded_port
        http-request add-header X-Forwarded-Proto https if { ssl_fc } forwarded_proto
    mode http
    server cloud 192.168.1.60:80  check port 80 inter 2000 rise 2 fall 3
Database preparation
To setup the database, I just created a new database called nextcloud with the Nextcloud user using
phpMyAdmin
.
All the tables get set up during installation.
For this setup we have the following db information:
host=192.168.1.100
username=nextcloud
password=passw0rd
dbname=nextcloud
Nextcloud installation
Getting Nextcloud
First we need to download the latest Nextcloud server package from
Nextcloud
.
We will use the Archive File containing the full package.
Unzip the file and move the content to /var/www/nextcloud.
Finally run chown to make sure apache is able to change some files on updates or app installation / uninstallation.
chown -R www-data.www-data /var/www/nextcloud
Basic packages installation
To run some Nextcloud maintenance tasks, sudo comes in quite handy. So we install it as well.
apt install sudo
Next, we are going to set up the easiest possibly way without any complex part on the web server side.
apt install apache2 libapache2-mod-php7.3 php7.3-gd php7.3-json php7.3-mysql \
            php7.3-curl php7.3-mbstring php7.3-intl php-imagick php7.3-xml \
            php7.3-zip php7.3-bz2 php7.3-gmp
Optional packages
These packages are optional but I like to have some previews and the clamav antivirus integration. So these packages have to be installed as well.
apt install ffmpeg libreoffice
apt install clamav clamav-daemon
APCu and Redis installation
To get some performance on filelocks and local memory cache, we have to install two things.
- APCu which takes care of the local memory caching
- redis-server that will be used as locking database for file locks
Finally we have to make sure that the user www-data is able to use redis. We do this by adding www-data to the redis group.
apt install redis-server php-redis php-apcu
usermod -a -G redis www-data
php configuration
Now it is time to configure the php installation. These are the options I set on my installation to start with. So far this works quite well.
As we use mod_php we have to use nano /etc/php/7.3/apache2/php.ini to edit the right configuration.
Do not forget to restart apache after changing these values using systemctl restart apache2
memory_limit = 512M

date.timezone = "Europe/Zurich"

upload_max_filesize = 16G
post_max_size = 16G

max_input_time = 3600
max_execution_time = 3600

output_buffering = 0

opcache.enable=1
opcache.interned_strings_buffer=8
opcache.max_accelerated_files=10000
opcache.memory_consumption=128
opcache.save_comments=1
opcache.revalidate_freq=1
Apache2 configuration
PHP is ready and now we have to make sure apache uses the right path to run Nextcloud from.
To do this we use nano /etc/apache2/sites-available/000-default.conf and make the virtual host entry look similar to the configuration below.
There are also the two well known redirects, we have to do here as we run https on the public facing side but the server itself only uses http.
The redirects used in the provided .htaccess file do not work using a ssl reverse proxy. If you miss these three entries, Nextcloud will provide you a warning that these entries do not work.
<VirtualHost *:80>
        ServerName cloud.example.com
        ServerAdmin hosting@example.com
        DocumentRoot /var/www/nextcloud

        ErrorLog ${APACHE_LOG_DIR}/error.log
        CustomLog ${APACHE_LOG_DIR}/access.log combined

        <Directory /var/www/nextcloud/>
                Require all granted
                AllowOverride All
                Options FollowSymLinks MultiViews
                <IfModule mod_dav.c>
                        Dav off
                </IfModule>
        </Directory>

        <IfModule mod_headers.c>
            Header always set Strict-Transport-Security "max-age=15552000; includeSubDomains"
        </IfModule>

        RewriteEngine On
        RewriteRule ^/\.well-known/carddav https://%{SERVER_NAME}/remote.php/dav/ [R=301,L]
        RewriteRule ^/\.well-known/caldav https://%{SERVER_NAME}/remote.php/dav/ [R=301,L]
</VirtualHost>
Next we have to make sure all the required modules are enabled. When finished, we restart apache2 to apply all the changes made.
a2enmod rewrite
a2enmod headers
a2enmod env
a2enmod dir
a2enmod mime
service apache2 restart
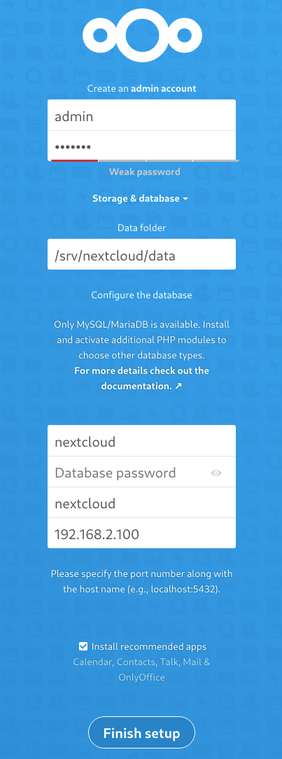
Installation wizard
Reaching this point, it is time to run the installation wizard of Nextcloud. This is quite easy. The screenshot below shows all you have to provide to make it work. You can choose to install the recommended apps or install the needed ones later by hand.
Important:
When clicking on Finish setup the installation works but the redirection fails, it is due to the lack of configuration and a wrong https redirect in HA-Proxy.
Nextcloud has no idea, that the page should generate https links and redirects.
After finishing this first installation step, you should find a new configuration file for Nextcloud at /var/www/nextcloud/config/config.php.
I had to modify this file a little bit to use all things and make Nextcloud work as expected.
- I made sure that
trusted_domainscontained the correct fqdn - Add
overwriteprotocolto make sure Nextcloud uses https links - Add the
memcache.*andredisconfiguration option to enable the caching on Nextcloud
<?php
$CONFIG = array (
  'instanceid' => 'instanceid',
  'passwordsalt' => 'generated_salt',
  'secret' => 'abcd/secret',
  'trusted_domains' =>
  array (
    0 => 'cloud.example.com',
  ),
  'datadirectory' => '/srv/nextcloud/data',
  'dbtype' => 'mysql',
  'version' => '18.0.3.0',
  'overwriteprotocol' => 'https',
  'overwrite.cli.url' => 'https://cloud.example.com',
  'htaccess.RewriteBase' => '/',
  'dbname' => 'nextcloud',
  'dbhost' => '192.168.1.100',
  'dbport' => '',
  'dbtableprefix' => 'oc_',
  'mysql.utf8mb4' => true,
  'dbuser' => 'nextcloud',
  'dbpassword' => 'yourSuperSecretPasswordHash',
  'installed' => true,
  'memcache.local' => '\OC\Memcache\APCu',
  'memcache.locking' => '\OC\Memcache\Redis',
  'memcache.distributed' => '\OC\Memcache\Redis',
  'redis' => [
     'host' => '127.0.0.1',
     'port' => 6379,
  ],
);
After updating the configuration, you should be able to log in and the application should work.
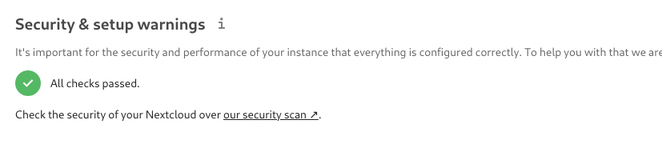
But as soon as you navigate to Administration->Overview, you will have some warning about missing indexes and wrong data types.
Run the following commands to fix these issues. There is no problem running them on an empty database. Running them on a large database will take a considerable amount of time.
cd /var/www/nextcloud
sudo -u www-data php occ db:add-missing-indices
sudo -u www-data php occ db:convert-filecache-bigint
sudo -u www-data php occ maintenance:update:htaccess
The overview page should now be presented with a green check mark telling you, that everything is ok. If there are any warnings, solve them before doing anything else.
By now, you have a running installation ready to use. Make sure you test your installation and everything works smoothly. As soon as you confirmed this, you could take a closer look at the steps I took to further tune my setup.
Server tuning
enabling cron to perform background tasks
By default the cron tasks get executed on page loads. This might be ok for your single user little Nextcloud. But as soon as you have more load, this is not a really good idea. The recommended way of running these tasks is using cron.
You can start the editor using the following command.
crontab -u www-data -e
At the end of the file, just enter the line below to run the tasks.
Just make sure the path to the cron.php fits your installation.
The line tells cron to run the script every five minutes.
*/5 * * * * php -f /var/www/nextcloud/cron.php
Switching apache from mpm_prefork to mpm_worker
As we know is the mpm_prefork mode of apache2 not the fastes and best way to run php application. It also consumes a lot of resources and does not scale very well. To change this, we switch apache2 to mpm_worker that allows us to handle more requests with less resources.
First we have to install php7.3-fpm as libapache2-mod-php7.3 is not compatible with the mpm_worker configuration.
The we have to apply all the php.ini configuration chages from above to the php.ini of the fpm setup.
apt-install php7.3-fpm
nano /etc/php/7.3/fpm/php.ini
Following the php.ini changes, we have to configure the worker pool to be able to handle the load.
When done, the last step is to restart the fpm service for the changes to take effect.
nano /etc/php/7.3/fpm/pool.d/www.conf
systemctl restart php7.3-fpm.service
The options change in the www.conf are the ones below.
pm = dynamic
pm.max_children = 120
pm.start_servers = 12
pm.min_spare_servers = 6
pm.max_spare_servers = 18
pm.max_requests = 500
Next, apache2 needs to be reconfigured. As I have no users on the host at this time, I just stop apache during the change. After enabling and disabling the components, we start apache again.
systemctl stop apache2
a2dismod php7.3
a2dismod mpm_prefork
a2enmod mpm_worker
a2enmod setenvif
a2enmod proxy_fcgi
a2enconf php7.3-fpm
systemctl start apache2
Recheck the installation and make sure Nextcloud still works as expected. The server should now be able to handle more requests at the same time.
enabling http/2
Now it is time to allow apache to use the newer http/2 protocol. This makes connections more efficient and reuses open sockets to bundle multiple requests.
Important: This is only available when apache is running mpm_worker or mpm_event!
a2enmod http2
systemctl restart apache2
If everything works as expected, you just have to uninstall the mod_php of apache2. By removing this package, we prevent activating it by accident and we do not have to worry about it anymore.
apt remove libapache2-mod-php7.3
Database performance
I recommend taking a closer look to your database setup as the Nextcloud database will grow and a badly configured mysql server will slow down the system a lot. Monitor your database and apply settings to optimize the mysql installation.
closing words
I used to know owncloud and had an installation running a few years ago. Sadly it could not keep up and failed syncing my files on a regular bases. This is why I migrated away to seafile. As seafile continues to slow down and had some project issues (e.g. failing background upload on my mobile), I am looking for something different. First I thought Nextcloud is just the new owncloud with all the same issues. In some cases this might be the truth but it made huge progress and transformed to a good and solid solution.
Just a small summary what load I put on the server when my personal test was over:
- 3 PCs all using a Gbit-LAN Connection syncing 300GB of data
- 3 Phones uploading a total of 40GB using the auto upload feature (activating was not easy as the app freezes)
- PCs were downloading the automatically uploaded files of the mobiles as well
- all that happened simultaniously
Learnings so far:
- clamav does take quite a lot of CPU power
- Mysql configuration issues will show up fast
- Having a VM with more cores and memory will help to run everything smoothly
- I do miss a “drive” mount on my windows machine. There is a prototype but it is currently broken
- The foto app misses many many features (e.g. browsing by date / time, virtual albums, sorting)
- The email integration is nice but will not replace my
roundcubeinstallation in the near future
Beside the missing “drive” feature on Windows, I do not really miss anything. Instead, I gained many things like the gnome integration on my Linux setups.
I continue to migrate away from seafile to Nextcloud as I can reduce my setup even more by shutting down baikal as well. Nextcloud provides all features (fileshare, file sync, auto upload, contact, shared calendars) I currently need.