mqtt + node-red + telegram
Part 2
In Part1 I showed you how to push NUT alerts to a mqtt server. In this post I’m going to show you the second part of my setup. How to use node-red to get these notifications and pass them over to my telegram bot . There are three steps to run this setup.
- Subscribe to mqtt
- parse the message to get the ups and notification type
- send it to a telegram bot
node-red
If you use a raspberry pi, you already might have node-red installed. If not, check out my blog post about setting node-red up on Debian Stretch here.
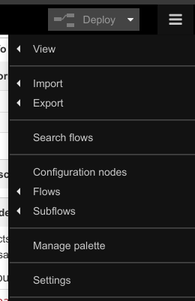
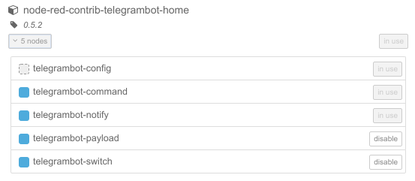
When Node-red is running, you have to install a palette item to get the telegram support. This can easily be done using the Burger menu --> Manage palette option. There you search for node-red-contrib-telegrambot-home and install the extension. This adds the 4 nodes plus one configuration node to your palette. Now node-red is ready for the tasks we like to perform and has all the required things to work.
MQTT
Subscribe to the topic

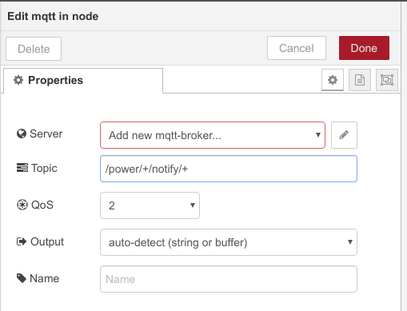
The subscribed topic on mqtt would be /power/+/notify/+. This enables the wildcard option for ups and type parts of the topic. Using this kind of subscription will make it quite easy if you decide to add another ups. For the alerting, there are no changes to the scripts required and the new alerts will show up. This also works even if there are multiple sender of such state messages. Node-red uses the mqtt topic as message topic as well and adds the message to msg.payload.
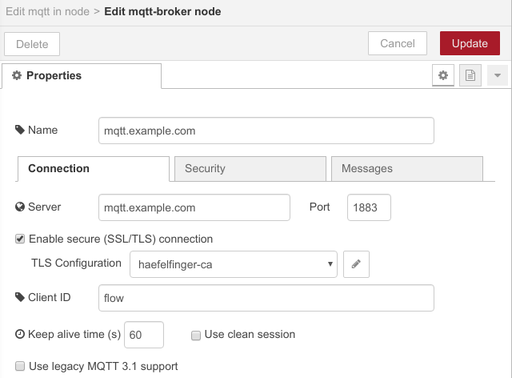
The configured mqtt server settings can be reused for multiple mqtt subscriptions on the same server. So you do not have to set up the mqtt connection for each node again. Just pick the one you created from the drop down. You have to upload the public key of your certificate authority to set up a TLS trust. You also have to provide a user and password if required to make it work. I recommend TLS and a dedicated user for each device. This way you may just disable one user if a device gets lost or could not be cleared.
Parse UPS Message

Next you have to get the ups and notification type out of the message topic and build up a new message containing all the information as separated fields. To do this, I use a custom function and paste the following bit of Javascript code into it. Make sure the index numbers fit your generated topic. We have /power/<ups>/notify/<type>. So ups is on index 2 and type on index 4 when splitting by /.
var message = msg.payload;
var topicElements = msg.topic.split("/");

var ups = topicElements[2].toLowerCase();
var type = topicElements[4].toLowerCase();

msg.payload = {
    message:message,
    ups:ups,
    type:type
}

return msg;
For the moment, you could just pass this message to a debug node to check if everything works. If you set up your NUT installation already, just pull the power plug on your UPS and check the notification results. Btw. do not forget to hit deploy if you changed the workflow on node-red.
You can send a test message using the following line on your NUT or other host where mosquitto_pub is installed.
mosquitto_pub -h mqtt.example.com -t "/power/upstest/notify/ONBATT" -m "Testmessage" -u mqttuser -P mqttpasswd --tls-version tlsv1.1 --cafile /etc/nut/mqttnotify/haefelfinger-ca.crt
At this point you have correctly set up the receiving side and prepared to send it to your telegram bot.
Telegram
Setup a bot
First of all you need a telegram account. Just create one on your mobile device. We like to have it set up there anyway to get the notifications.
To use a telegram bot, you have to create one first. There are some nice guides out there but for the sake of completion I just put the steps here.
Just open a new chat session to the
botfather
and send /start.
Next hit /newbot to start the setup. First you need to enter a name for the bot. This is easy to choose. The second question is about the username for the bot.
This has to end with bot and you need more than one try as many names are already taken.
As soon as you find a free username the bot is ready and you get the token for the given bot.
Keep this token secret!
get the chat id
Why do we need to get a chatid from the bot? I do not like to have my bot chatting with someone else. So I limit it to the direct chat with me. The id may also be a chatid of a groupchat containing other people like other family members. To have a bot to chat with any person, you do not need to get the chatid up front but to write the code of your handler to work with multiple and unknown ids.
When your bot has been created, send a chat message like test to your new bot and then use the api to get the chat id.
To do this, just use the token you received during the bot setup and replace {bot_token} with it.
Then run the command and get a nice json formatted output.
curl -s "https://api.telegram.org/bot{bot_token}/getUpdates" | python -m json.tool
When everything works as expected, there is an answer similar to the example below. The ids are not my real ids of course. :-D
{
    "ok": true,
    "result": [
        {
            "update_id": 987654321,
            "message": {
                "message_id": 1,
                "from": {
                    "id": 123456789,
                    "is_bot": false,
                    "first_name": "Your",
                    "last_name": "Name",
                    "language_code": "en"
                },
                "chat": {
                    "id": 11223344556,
                    "first_name": "Your",
                    "last_name": "Name",
                    "type": "private"
                },
                "date": 1575929133,
                "text": "test"
            }
        }
    ]
}
Now you have all parts ready and setup for the final step. Combine the bot with your node-red installation to send messages to you.
Send messages from node red
Prepare the message
To send a message we first prepare the content and replace the payload with the resulting message that gets sent.
To do this you could just add another function node to the workflow and use the following javascript to build the message.
var message = "UPS: " + msg.payload.ups + "\n";
message += "State: " + msg.payload.type + "\n";
message += "Message: " + msg.payload.message + "\n";

msg.payload = message;

return msg;
Send the message

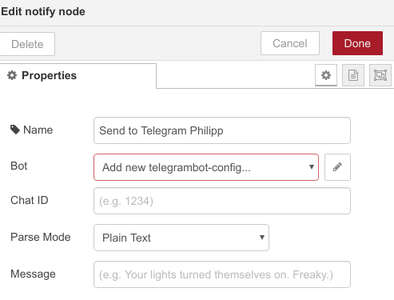
To send a message you can use the notify node from the telegram node group.
When you configure the new node, you can add a new telegram bot. Click on the edit icon on the right side of the bot selection drop down.
Next enter the details of the Bot like the name and the token generated before. Also add the chatid here if your bot should only be allowed to talk to this specific chat id.
Back to the notify node page, you have to set the chat id as well to make sure the bot knows where to post the message.

That’s it so far. Just send a test mqtt message like you did already in the previous step to check the broker setup.